Application “BluApp” (Bluetooth Panel Control)
Visualizar en españolVideo BluApp
Index
- Introduction
- How the BluApp application works as a TX / RX console
- Operation of the BluApp application as a control panel
- Detailed command format modify name (00)
- Detailed command format add button (01)
- Detailed command format add text box (02)
- Detailed command format add text box with multiple contents (0A)
- Detailed command format add viewer (03)
- Detailed command format add html object (04)
- Detailed command format store application (05)
- Detailed command format delete application (06)
- Complete list of messages
- Edit the BluApp application locally
- Configuration example for a home automation project
- Contact
Introduction
Currently, smartphones offer the user advanced interface, sensorization and connectivity capabilities. But what happens if the user wants to establish a connection between his smartphone and an electronic system designed by him? In this situation the user find two difficulties:
- Simultaneously with the design of the electronic system it is necessary to design the smartphone application.
- The design of the electronic system must have some of the advanced connectivity of the smartphone.
The biggest complication is found in the first point, where an additional complexity is added in the design of the general solution that is to carry out the complete program in the smartphone. For example, if the user is thinking of using Arduino modules in their electronic system, in addition to being able to function in that environment, they should know and develop an application on their smartphone. The application "Blutooth Panel Control" (hereinafter BluApp) allows you to design a control panel on your android device of your electronic project. For this, it uses the HC-05 or HM-10 module and allows two possibilities, use as a serial terminal to debug the communication interface with a microcontroller, or develop a personal control panel according to the needs of our project. To configure the control panel you can use the same bluetooth communication interface from the microcontroller or edit from the same BluApp application. In both cases it is possible to store the control panel permanently, that is to say without the need to be loaded each time the application is started. In the communication commands to edit the control panel, html language is used, this allows a wide range of personal settings possibilities (button color, add text, sizes, etc.). The commands allow, in a simple and quick way, to add command control buttons, readings of remote variables, etc. The BluApp application comes with an example of control panel configuration. For who is the BluApp application:
- Ideal for learning electronics in a fun way.
- Ideal for rapid prototyping of a new idea.
- Ideal to show your project.
- Ideal to control your finished product
The user should only use a bluetooth module HM10 or HC05 on the side of the electronic system which requires a minimum configuration.
Note: No training or support for the BluApp application is available. The use of the BluApp application and the examples provided are at your own risk.
How the BluApp application works as a TX / RX console
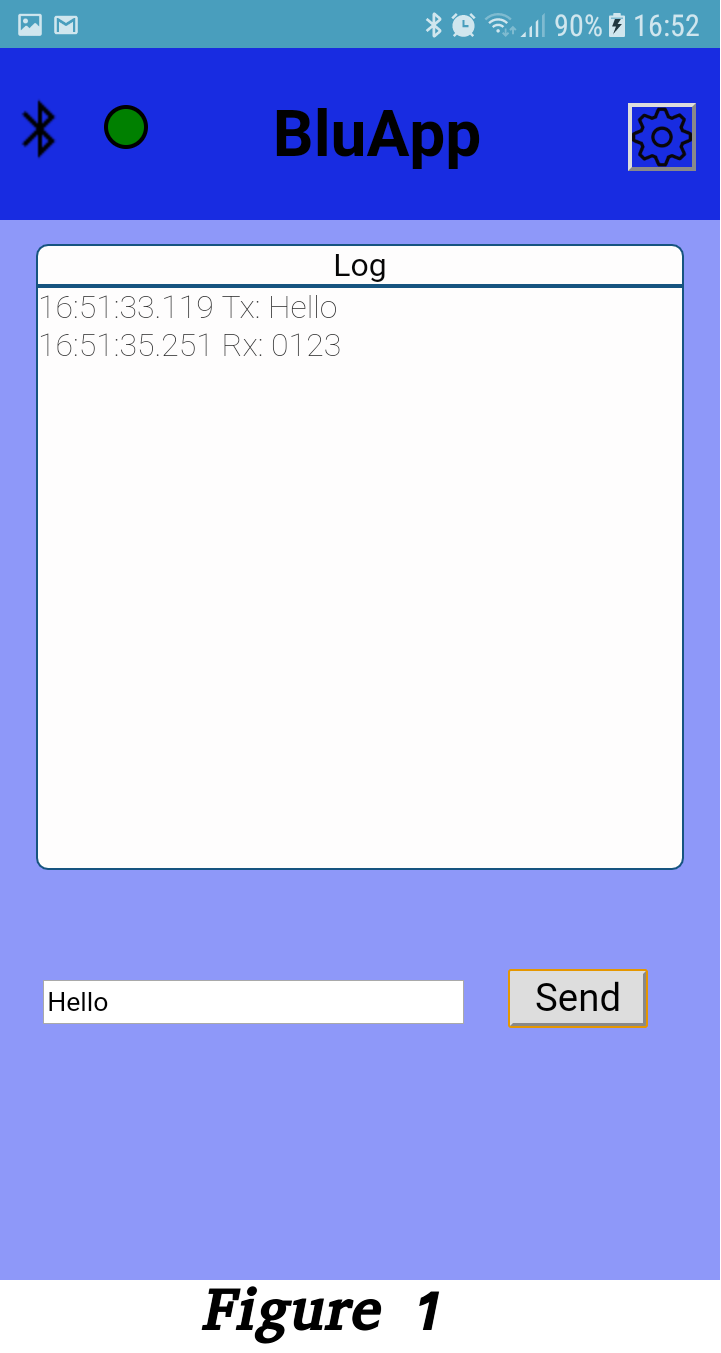
The main screen of the BluApp application can be seen in figure 1. It consists of a header with a connection status indicator (red disconnected and green connected) and a button to enter the settings. In the main body there is a box with the history of communications between the BluApp application and the bluetooth module and also a changeable text box and a send button.

If the configuration button is pressed, then the sub-menu "Connection" is displayed and the "Refresh Classic Bluetooth" button is pressed (or "Refresh LE Bluetooth"), it is possible to see the list of devices that are available to connect. Then, the device to be connected must be pressed in the list. Figure 2 shows an established connection with the device "mcm", in the header the indicator is green (with device connection) and finally the possibility of disconnecting by means of the "Disconnect" button is added.
By pressing the configuration button again it is possible to return to the main screen. At this time it is possible to observe the characters received remotely (by means of the history box) and those transmitted from the BluApp application (by means of the "Send" button). Using the BluApp application in this way it is possible to start debugging the communication with the electronic system that we are developing, for example to determine if something is actually being transmitted, if the order of transmission of characters is desired, etc.
Operation of the BluApp application as a control panel
Once there is a communication established between the BluApp application and the electronic system and we are able to send and receive the character frames we desire, it is possible to customize the BluApp application according to our particular needs.
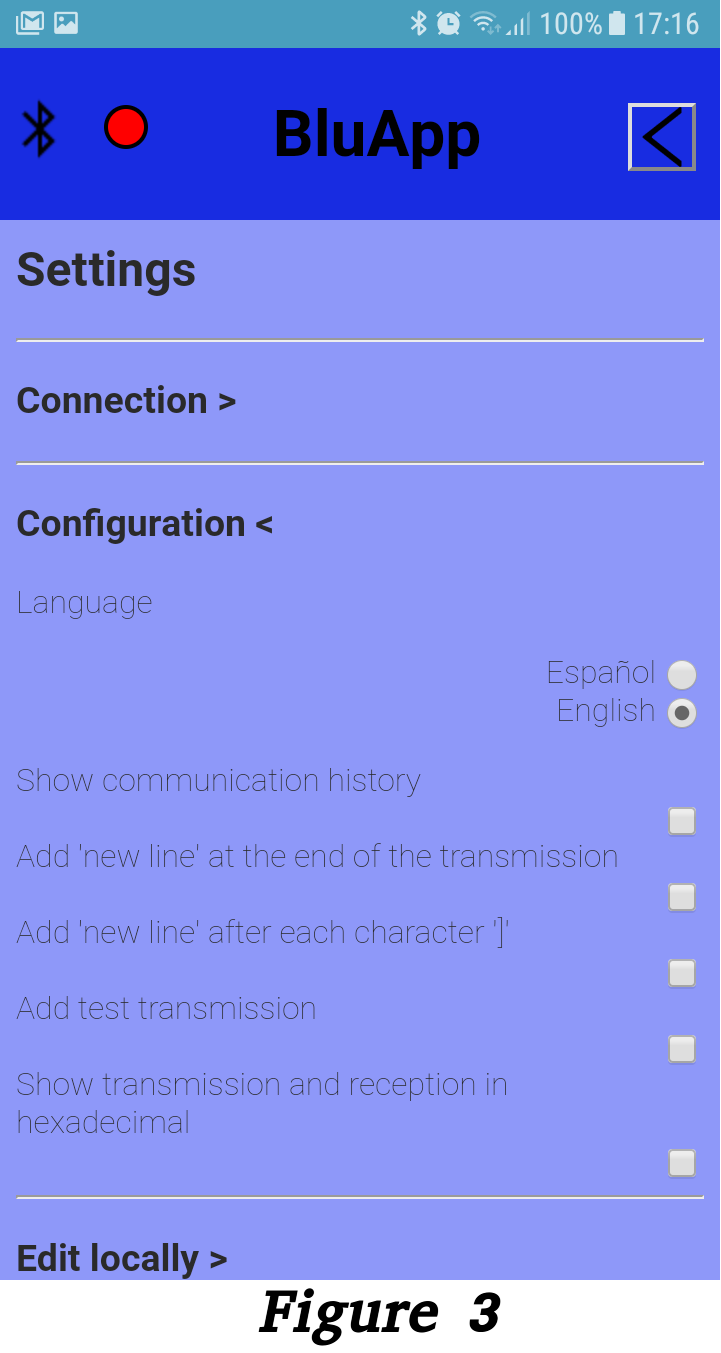
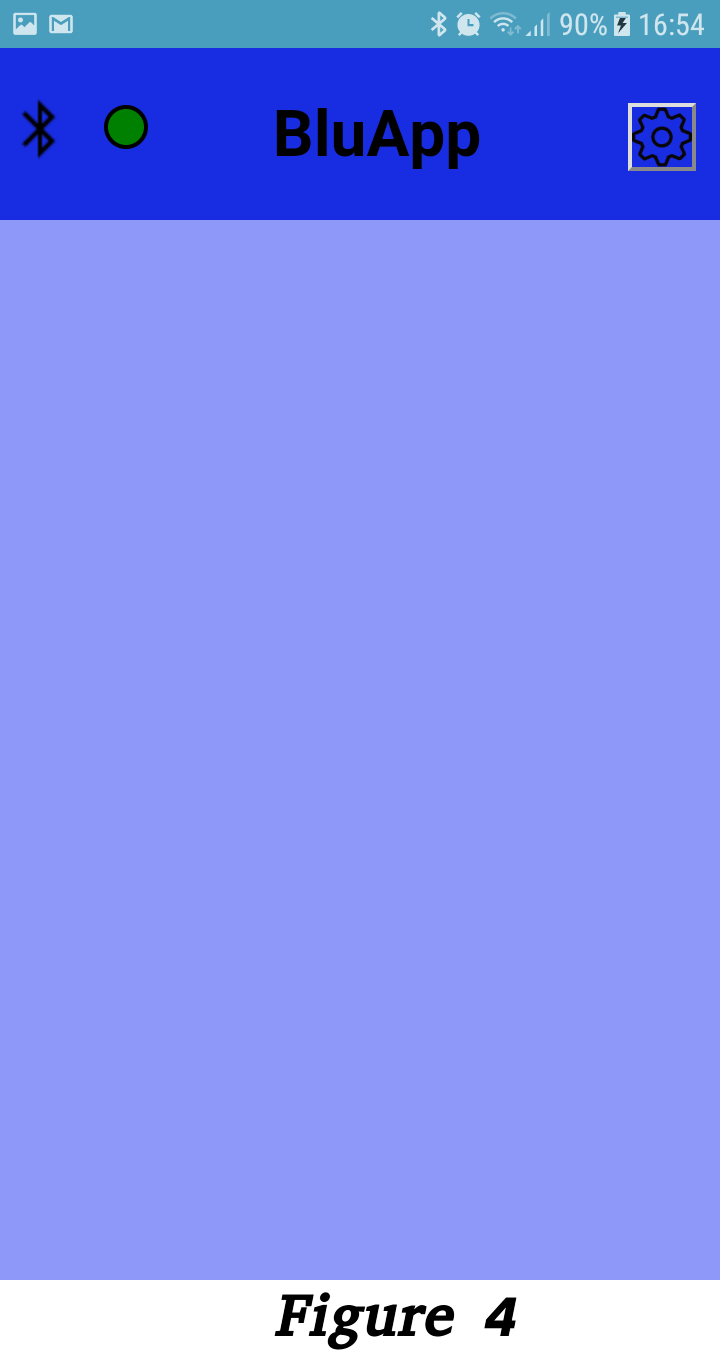
If we do not want to see the history box and the test transmission, we must access the settings, then display the "Configuration" sub-menu and deselect the options "Show communication history" and "Add test transmission" (see figure 3). When you return to the main screen you can see that it is empty and ready to be adapted to our project (see figure 4).
In the "Configuration" sub-menu it is also possible to specify if we want the application to transmit a character "\n" at the end of each transmission or after each character "]". Finally it is possible to indicate that we want to display the history in hexadecimal format, in this mode the test transmission must be edited with two hexadecimal digits (which will represent the ascii code) followed by a space, for example the hexadecimal string "30 31 32 32 0A " refers to the string "0123\n".
Using the BluApp application as a control panel you can add the following objects:
- Button that sends a configurable text string
- Editable text box
- Add text box with multiple contents
- Button associated with a text box (content is sent)
- Variable viewer with validity indicator
- Custom title
- Html objects
To add new objects in the main screen of the BluApp application you must send commands that have the following format:
[NN;aaa;....;xxxxxx]\n
Where:
- The characters "[" and "]" indicate the start and end of the command frame in question
- The command frame is divided into different fields separated by the character ";"
- The characters "NN" indicate the command number
- The characters "aaa", "xxxxxxx", etc. represent the parameters of the frame in question. These character strings have variable length
- The "\n" character indicates the completion of the command
In the case that one of the fields is html code, it is important to take into account that all identifiers to be assigned must start with "_id_". Otherwise, the command will be discarded and the BluApp application will return a message of type "[0B; error00]\n".
For example, to modify the title of the BluApp application with the name "Personal" it is necessary to send the following message to the BluApp application: "[00Personal]\n". Therefore the command number for this case is "00".
In addition to adding different objects to the BluApp application through commands, it is possible to permanently save that configuration or erase it. Therefore the electronic system does not necessarily have to configure the control panel every time it starts and on the other hand it is possible to erase the current configuration and update it dynamically.
Table 1 shows the list of possible commands to add objects to the BluApp application.
| NN | Command Name |
|---|---|
| 00 | Modify application name |
| 01 | Add button |
| 02 | Add text box |
| 0A | Add text box with multiple contents |
| 03 | Add viewer |
| 04 | Add html object |
| 05 | Permanently store the custom application |
| 06 | Delete the custom application |
Detailed command format modify name (00)
The format of this command is the following:
[00Personal]\n
In this case "Personal" is the name that will be displayed in the BluApp application header.
Detailed command format add button (01)
The format of this command is the following:
[01;_id_xx;yyyy;zzzz;<button id='_id_xx'>Boton 1</button>]\n
It can be seen that this command has five fields. The first field is the command number (in this case "01").
The second field indicates the name of the identifier that will be used in the BluApp application for this object, in this case the identifier "_id_xx" will be used. It is important to remember that all identifiers that are used must start with "_id_".
The third and fourth fields are related in the following way, if we want the button to send a fixed string each time it is pressed, field three specifies which is this fixed string and field four must be "undefined". For example, if we want the fixed string "pepe" to be sent every time the button is pressed, the command should be:
[01;_id_xx;pepe;undefined;<button id='_id_xx'>Boton 1</button>]\n
In this example, each time the button is pressed, the BluApp application will send the following message to the remote device:
[07pepe]\n
On the other hand, if we want to associate this button with the contents of a text box, field three must be "undefined" and field four must be the identifier of the text box, for example:
[01;_id_xx;undefined;_id_caja;<button id='_id_xx'>Boton 1</button>]\n
In this example, each time the button is pressed, the BluApp application will send the following message to the remote device:
[08;_id_caja;ejemplo]\n
In this case, a command 02 was previously used to add a text box and the user edited the text "example".
Finally, the fifth field is the html code that will add the button object in the BluApp application. Note that the id used in this field is the same one that contains the second field.
Detailed command format add text box (02)
This command allows you to add a text box in the BluApp application that allows you to edit text and then send it remotely by pressing a button configured for that purpose. The format of this command is the following:
[02;_id_ww;<input type='text' id='_id_ww'>Text 1</input>]\n
It can be seen that this command has three fields. The first field is the command number (in this case "02").
The second field indicates the name of the identifier that will be used in the BluApp application for this object, in this case the identifier "_id_ww" will be used. It is important to remember that all identifiers that are used must start with "_id_" and that they should not be repeated between different objects.
Finally, the third field is the html code that will add the text box object in the BluApp application. Note that the id used in this field is the same one that contains the second field. In the html code of this field it is possible to indicate three different types of entries:
- type='text' : to indicate a text box entry
- type='range' min='-10' max='10': to indicate a slide bar entry with lower limit of -10 and upper limit of 10
- type='checkbox': to indicate a checkbox entry
Detailed command format add text box with multiple contents (0A)
This command allows you to add a text box (which may or may not be visible in the BluApp application) whose content is determined by other sources (for example: input type=’checkbox’, input type=’range’, etc.).
The content of this box can be sent to an user from the BluApp application (associating it with a button by means of the command "01") or sending it periodically every mSeg (time specified previously)
The format of this command is the following:
[0A;_id_ee;xxxx;_id_1;_id_2;_id_3;<input type='text' id='_id_ee'>Text 1</input>]\n
This command has a variable number of fields. The minimum number of fields is four. The mandatory fields are the first field ("0A" type of command), the second field (in the example "_id_ee" which is the identifier assigned to the html object of the command), the third field (in the example "xxxx" which is the periodicity of the response expressed in mSeg) and the last field that is the html code of the added object.
As objects will be associated, it is necessary to add their identifier after the third field (in the example they are "_id_1", "_id_2" and "_id_3").
For example, in the case that the field "xxxx" is "100" and that "_id_1", "_id_2" and "_id_3" are associated with text boxes containing the strings "Text1", "Text2" and "Text3" respectively , then the BluApp application will send periodically every 100 mSeg the frame:
[08;_id_ee;_id_1;Text1;_id_2;Text2;_id_3;Text3]\n
Regardless of the periodicity, at the time that the value of any of the entries is modified, that modification is informed instantly. If the content of the entry with identifier "_id_2" goes from having a value "Text2" to one "Text2modified", the BluApp application will send an instant response like the following:
[08;_id_ee;_id_2;Text2modified]\n
It can be seen that in the previous message only the object "_id_2" was referenced, but in the following periodic response it will have:
[08;_id_ee;_id_1;Text1;_id_2;Text2modified;_id_3;Text3]\n
If it is not necessary to have the inputs periodically and we only need to have the information of the changes that are taking place, the third field of the command "0A" (periodicity) must be configured with a value "0", that is, without periodicity.
In the example seen, an entry is configured with the identifier "_id_ee", this entry should be thought of as a container of the other defined entries (in this case "_id_1", "_id_2" and "_id_3"), that is to say that the content of "_id_ee" will be a string of characters concatenated with the values of the other identifiers. In our case initially the value of the entry "_id_ee" was ";_id_1;Text1;_id_2;Text2;_id_3;Text3" and then it happened to be “;_id_1;Text1;_id_2;Text2modified;_id_3;Text3”.
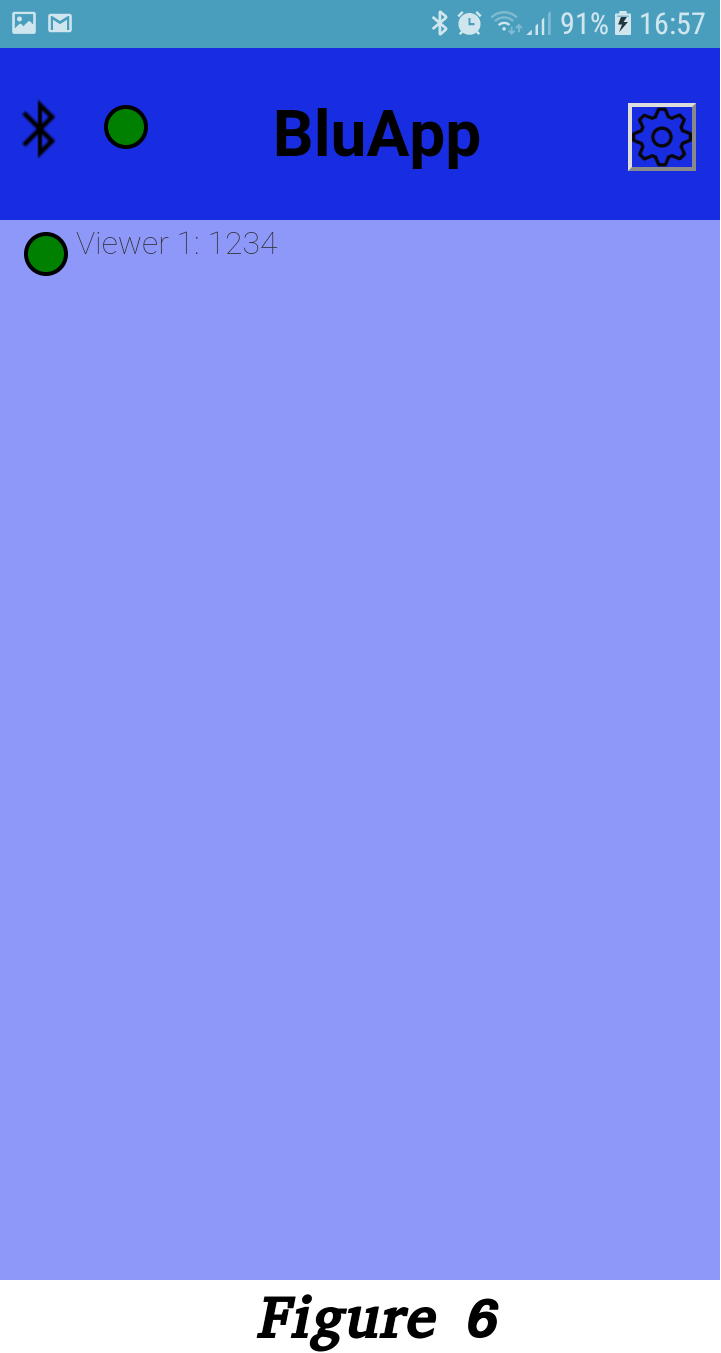
Detailed command format add viewer (03)
This command allows to visualize a remote variable in the BluApp application, also indicating if it is current or obsolete. The format of this command is the following:
[03;Viewer 1: ;_id_pp;2000;<div id='_id_pp'></div>]\n
It can be seen that this command has five fields. The first field is the command number (in this case "03").
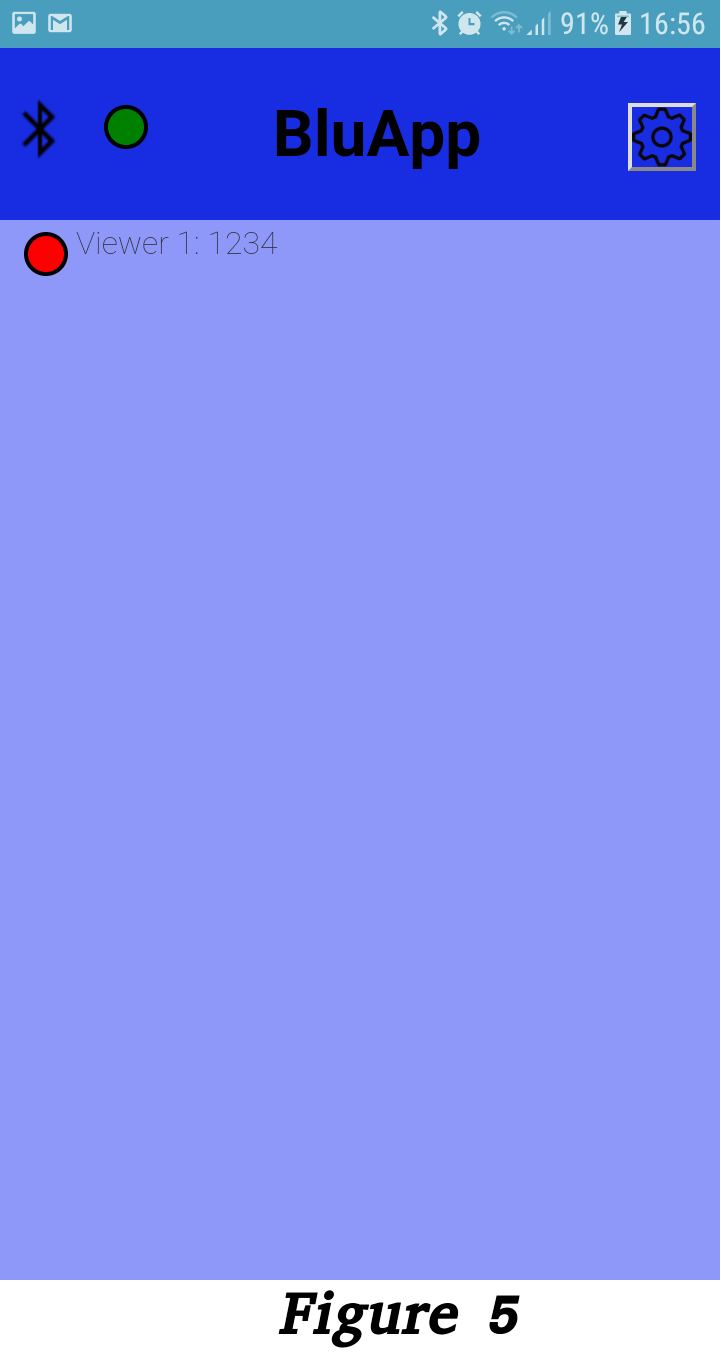
The second field is the name that will be displayed in the BluApp application for this viewer. In the previous case, the name would be "Viewer 1:".
The third field indicates the name of the identifier that will be used in the BluApp application for this object, in this case the identifier "_id_pp" will be used. It is important to remember that all identifiers that are used must start with "_id_" and that they should not be repeated between different objects.
The fourth field indicates the maximum time from which it is considered that the displayed value of the variable is obsolete. The unit of this time is mSeg, in the previous example the time is 2000 mSeg. To show a value, the electronic system must send the following update message:
[09;_id_pp;1234]\n
In this case, if the previous message is sent periodically less than 2000 mSeg each time, then the viewer will be considered valid and its indicator will be green (see figure 6), instead when it takes more than 2000 mSeg without receiving an update message the viewer will be considered obsolete and its indicator will be red (see figure 5).
Finally, the fifth field is the html code that will be added in the BluApp application. Note that the id used in this field is the same one that contains the second field.
Detailed command format add html object (04)
This command is useful for adding html objects to the BluApp application. The format of this command is the following:
[04<div>Test</div>]\n
In this command the command number (04) is indicated and then the html code to be added in the BluApp application.
Detailed command format store application (05)
This command is used when it is necessary to permanently save all the objects added in the BluApp application. The format is as follows:
[05]\n
This action can also be carried out by entering the configuration of the BluApp application, expanding the "Save" sub-menu and then pressing the "Save" button.
Detailed command format delete application (06)
This command is used when it is necessary to delete all the objects added in the BluApp application and leave it blank. The format is as follows:
[06]\n
This action can also be done by entering the configuration of the BluApp application, expanding the "Save" sub-menu and then pressing the "Delete" button.
Complete list of messages
As it was possible to see in addition to the messages to configure the BluApp application there are other messages sent indicating that a button were pressed or messages to update values of a viewer (messages "07" to "09"). Table 2 shows the complete list of commands and messages.
| N° | Example | Description |
|---|---|---|
| 00 | [00Personal]\n | Command sent from the electronic system to the BluApp application to modify the title |
| 01 | [01;_id_xx;yyyy;zzzz;<button id='_id_xx'>Button 1</button>]\n | Command sent from the electronic system to the BluApp application to add a button |
| 02 | [02;_id_ww;<input type='text' id='_id_ww'>Text 1</input>]\n | Command sent from the electronic system to the BluApp application to add a text box |
| 03 | [03;Viewer 1: ;_id_pp;2000;<div id='_id_pp'></div>]\n | Command sent from the electronic system to the BluApp application to add a viewer |
| 04 | [04<div>Test</div>]\n | Command sent from the electronic system to the BluApp application to add html code |
| 05 | [05]\n | Command sent from the electronic system to the BluApp application to permanently store the configured objects |
| 06 | [06]\n | Command sent from the electronic system to the BluApp application to delete the configured objects |
| 07 | [07pepe]\n | Fixed message sent from the BluApp application to the electronic system each time a button configured to send a fixed text string is pressed |
| 08 | [08;_id_gg;example]\n | Message sent from the BluApp application to the electronic system each time a button configured to send a text string edited in a text box is pressed. Another possibility is that it is a message sent from the BluApp application because it is associated with a text box with multiple contents |
| 09 | [09;_id_pp;1234]\n | Message sent from the electronic system to the BluApp application to update the value of a viewer |
| 0A | [0A;_id_ee;xxxx;_id_1;_id_2;_id_3;<input type='text' id='_id_qq'>Text 1</input>]\n | Command sent from the electronic system to the BluApp application to add a text box with multiple content |
| 0B | [0Bxxxx]\n | Message sent from the BluApp application to the electronic system to indicate error. |
Edit the BluApp application locally
As you could see, the addition of the objects that allow you to customize the BluApp application according to the needs of our project is through the reception of messages.
To make things easier, the BluApp application allows you to edit a text buffer that will contain the configuration commands and then send them to your reception buffer, in this way it is possible to have a customized application and focus the development of the electronic system directly on messages of the type "07", "08" and "09".
When entering the configuration of the BluApp application and expanding the sub-menu "Edit locally" you can access an editable text box, six buttons to add command templates, a button to clean the text box and finally a button to send to the reception buffer in the BluApp application (see figure 7).
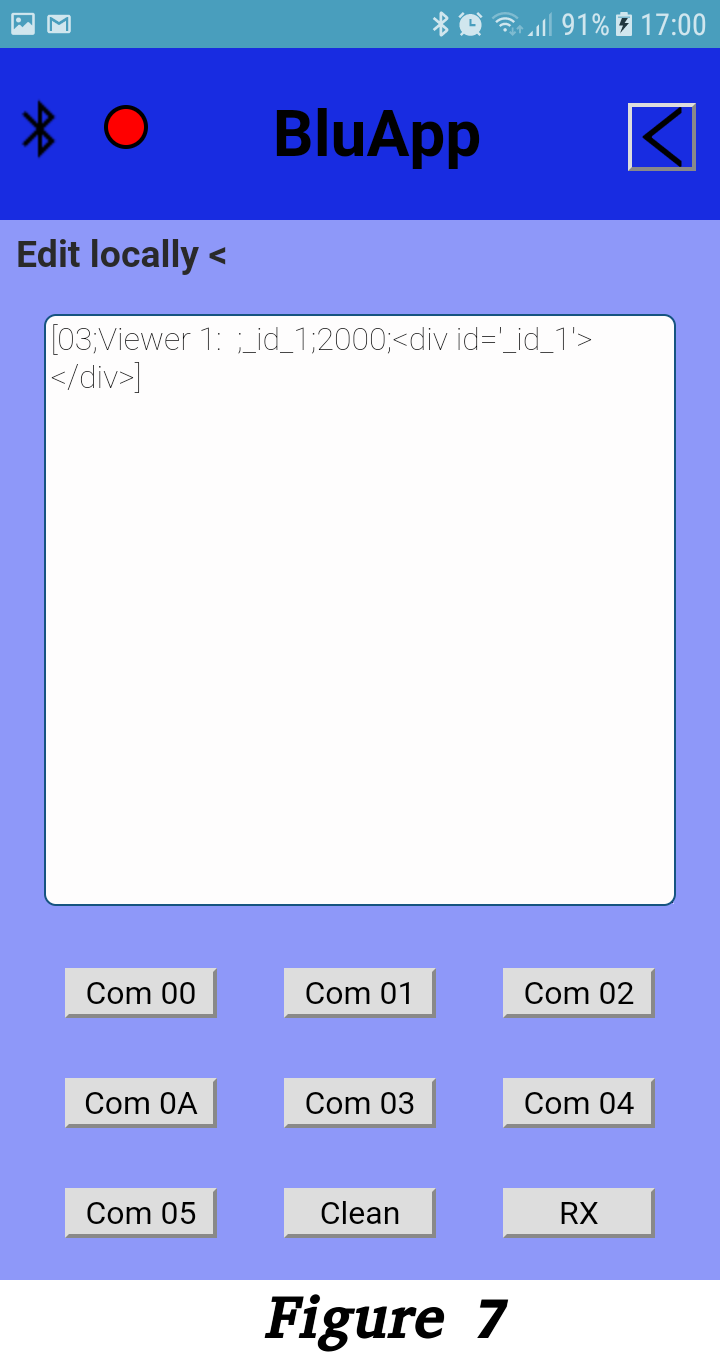
In order to use this feature, the BluApp application must not be connected to any device.
Configuration example for a home automation project
It has an electronic system with microcontroller for use in home automation that has the following capabilities:
- Output proportional light 1
- Output proportional light 2
- Output on/off Light 3
- Output on/off Light 4
- Output for open garage door
- Output for close garage door
- Input state garage door
- Output proportional blind 1
- Output proportional blind 2
- Input sensor access 1
- Input sensor access 2
- A Bluetooth interface through an HC-05 device
The electronic system solves the electronic stages of adaptation, load control and others, but developing a modern interface or control panel that allows the control and monitoring of it is not simple. For this reason we use the BluApp application.
First you should think about a draft of our application, an option can be to divide the screen into four areas separated by titles ("Lights", "Blinds", "Garage door" and "Access"). Then we must think what html objects we need and what identifier each will have (see Table 3).
| Html codes command | Id | Description |
|---|---|---|
| <h3>Lights</h3> | Title of the first area "Lights". This control is added by means of the command "04". | |
| <input type=’range’ ..> | _id_1 | Sliding bar to control the proportional output "Light 1". This control is added by means of the command "04". |
| <input type=’range’ ..> | _id2_ | Sliding bar to control the proportional output "Light 2". This control is added by means of the command "04". |
| <input type=’checkbox’ ..> | _id_B | Checkbox that control Light 3 |
| <input type=’checkbox’ ..> | _id_C | Checkbox that control Light 4 |
| <h3>Blinds</h3> | Title of the second area "Blinds". This control is added by means of the command "04". | |
| <input type=’range’ ..> | _id_3 | Sliding bar to control the proportional output "Blind 1". This control is added by means of the command "04". |
| <input type=’range’ ..> | _id_4 | Sliding bar to control the proportional output "Blind 2". This control is added by means of the command "04". |
| <h3>Garage door</h3> | Title of the third area "Garage door". This control is added by means of the command "04". | |
| <div id='_id5'.. ></div> | _id_5 | Viewer that indicates the state of the garage door ("open" or "closed"). This control is added by means of the command "03" with a validity time of 1 second. |
| <button id='_id6'.. </button> | _id_6 | Button to activate the "Open" output of the garage door. This control is added by means of the command "01". |
| <button id='_id7'.. </button> | _id_7 | Button to activate the "Close" output of the garage door. This control is added by means of the command "01". |
| <h3>Accesses</h3> | Title of the fourth area "Accesses". This control is added by means of the command "04". | |
| <div id='_id8'.. ></div> | _id_8 | Viewer that indicates the status of access 1 ("open" or "closed"). This control is added by means of the command "03" with a validity time of 1 second. |
| <div id='_id9'.. ></div> | _id_9 | Viewer that indicates the status of access 2 ("open" or "closed"). This control is added by means of the command "03" with a validity time of 1 second. |
| <input type='text' id='_id_A' style='display:none' ></input> | _id_A | Text box linked to the contents of "_id_1", "_id_2", "_id_3" and "_id_4". This control is added by means of the command "0A" with a periodicity of 1 second. |
Then we must specify the commands that should be sent to the BluApp application. These commands are the following:
[00House Control]
[04<h3>Lights</h3><input type='range' min='-10' max='10' id='_id_1' align='left' style='width:60%'>Light 1</input><br><input type='range' min='-10' max='10' id='_id_2' align='left' style='width:60%'>Lights 2</input><input type='checkbox' id='_id_B' unchecked>Light 3</input><input type='checkbox' id='_id_C' unchecked>Light 4</input><br><h3>Blinds</h3><input type='range' min='-10' max='10' id='_id_3' align='left' style='width:60%'>Blind 1</input><br><input type='range' min='-10' max='10' id='_id_4' align='left' style='width:60%'>Blind 2</input><br><h3>Garage door</h3>]
[03;State: ;_id_5;2000;<div id='_id5' style='width:50%' ></div> <br>]
[01;_id_6;open;undefined;<button id='_id_6' style='width:20%' >Open</button>]
[01;_id_7;close;undefined;<button id='_id_7' style='width:20%' >Close</button>]
[04<br><h3>Accesses</h3>]
[03;Access 1: ;_id_8;2000;<div id='_id_8'></div><br>]
[03;Access 2: ;_id_9;2000;<div id='_id_9'></div>]
[0A;_id_A;1000;_id_1;_id_2;_id_3;_id_4;<input type='text' id='_id_A' style='display:none' ></input>]
[05]
It is noted that at the beginning a command "00" is sent to modify the title of the BluApp application to "House Control" and html code is added by means of the command "04" for some titles and entries. Then they are specified buttons, and viewers by means of commands "01" and "03" respectively. At the end a command "0A" is added to be able to link multiple entries (contents of "_id_1", "_id_2", "_id_3", "_id_4", _id_B and _id_C) to the identifier "_id_A" and finally a command "05" is added to save permanently the application.
There are three ways to load the home automation configuration to the BluApp application:
- The first time the electronic system establishes communication with the BluApp application, it sends the commands previously indicated by the serial link
- Locally edit the BluApp application by entering the configuration, expanding the "Edit locally" sub-menu, editing the commands previously indicated in the text box and then pressing the "RX" button
- Entering the adjustment menu and then the Help sub-menu and pressing the "Add example Home automation" button
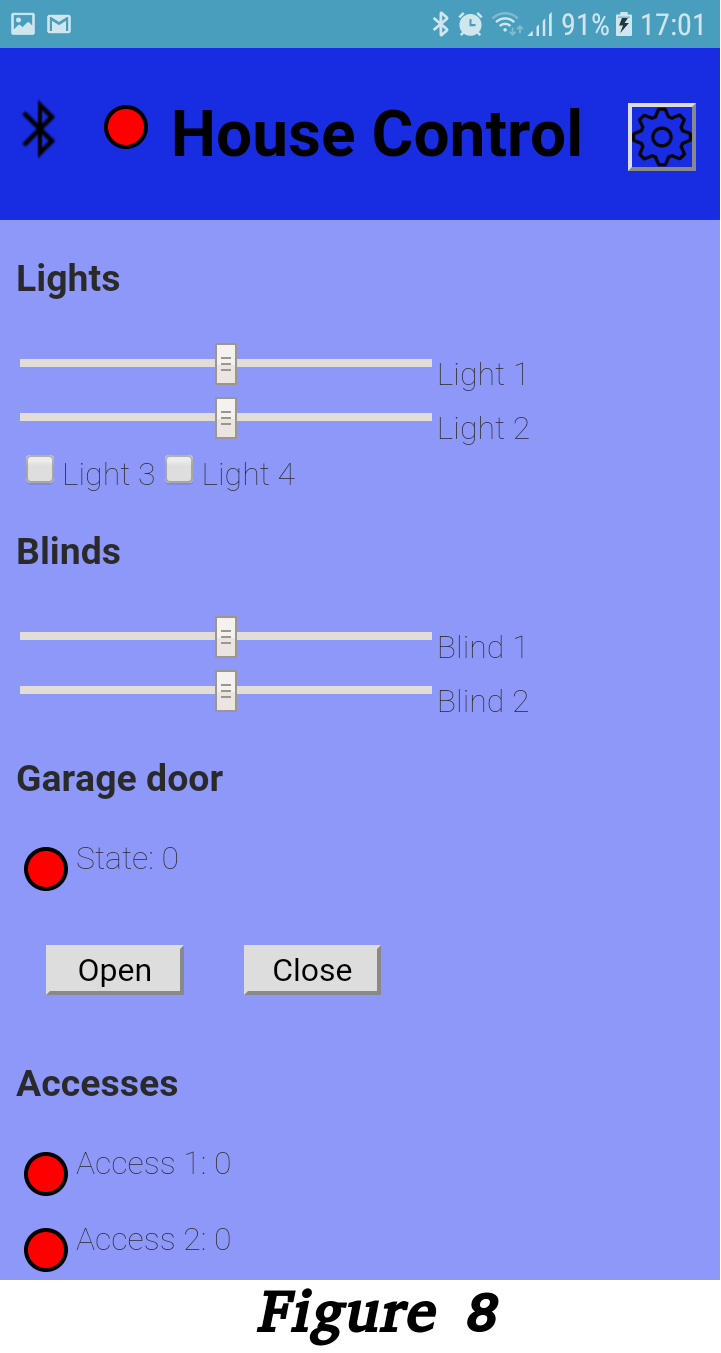
In figure 8 you can see how our custom application is.
Contact
mcmappser@gmail.com
https://mcmb.neocities.org/